Harmony UART Command Service with SAMD21
Table of Contents
Harmony UART Command Service with SAMD21 🎯
Building on our UART Console Service tutorial, we'll now implement the Microchip Harmony Command Service to create an interactive command-line interface (CLI). This service allows you to build a robust system where users can send commands over UART and receive responses, making your embedded system highly interactive and debuggable.
Table of Contents
- What is the Harmony Command Service?
- Prerequisites
- Setting Up the Command Service
- Implementing Custom Commands
- Testing the Command Interface
- Implementing Command History
- Conclusion
What is the Harmony Command Service?
The Harmony Command Service is a middleware component that:
- Parses incoming text commands from the console
- Executes predefined command handlers
- Provides structured command registration and help systems
- Supports command parameters and arguments
- Integrates seamlessly with the Console Service
This is particularly useful for:
- System configuration and debugging
- Runtime parameter adjustment
- Device testing and validation
- Interactive demonstrations
Prerequisites
Before starting this tutorial, ensure you have completed the UART Console Service setup as this tutorial builds directly on that foundation.
Setting Up the Command Service
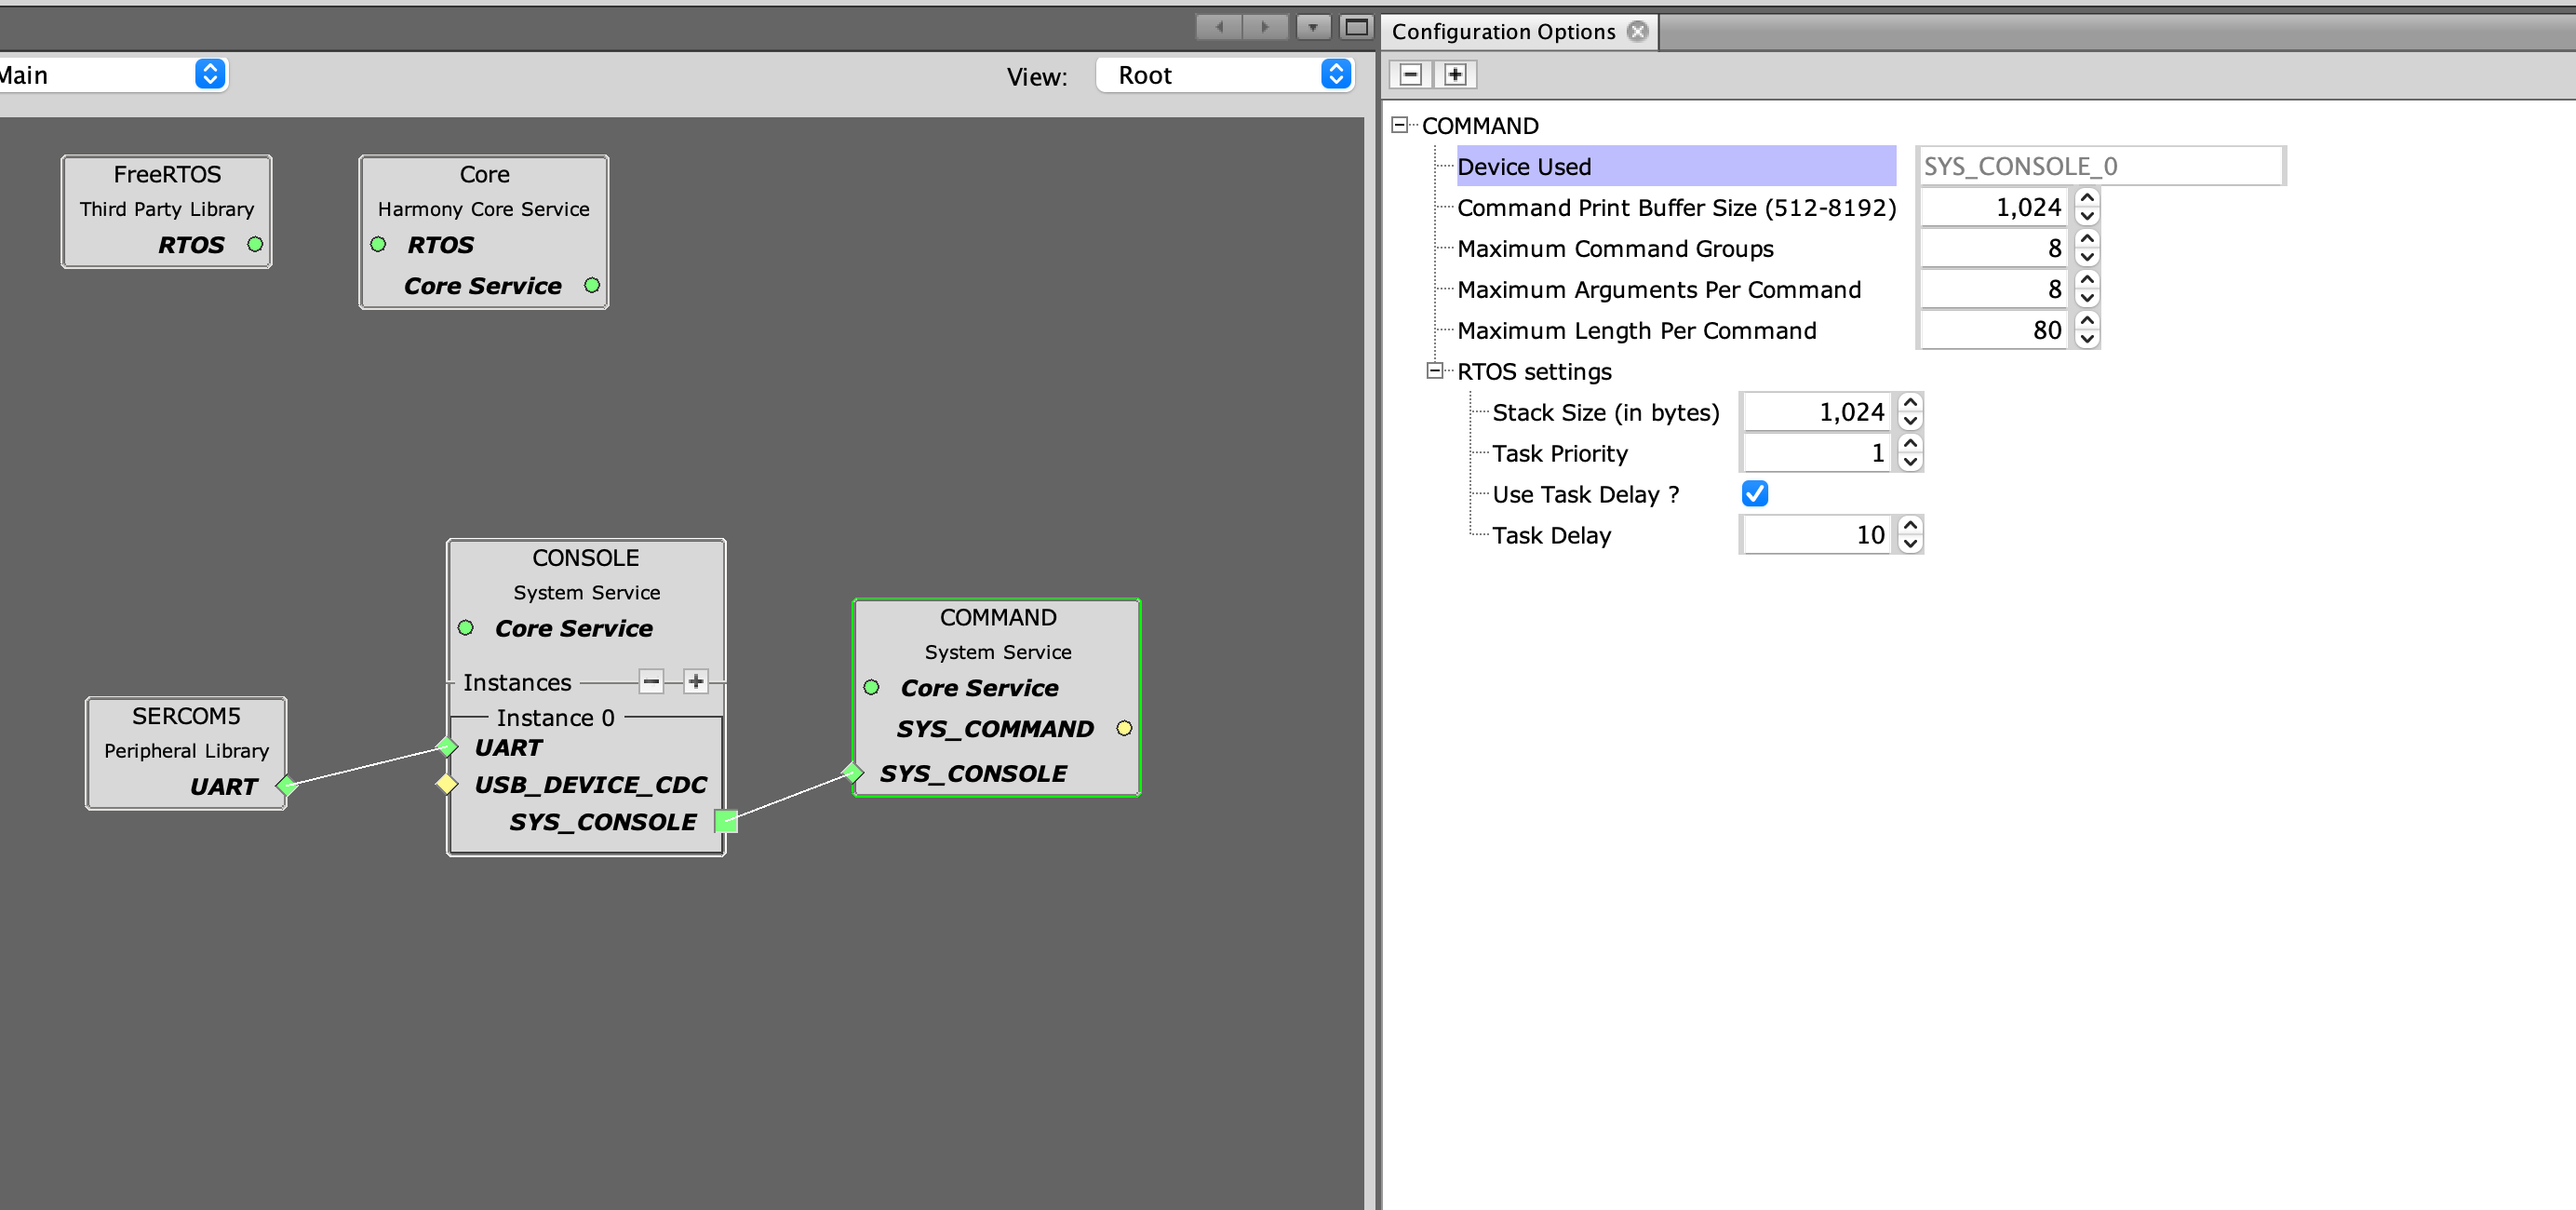
Step 1: Add the Command Service Component
- Open your existing Harmony project with the Console Service already configured
- In MPLAB Harmony Configurator (MCC), navigate to Middleware > System Services > Command
- Add the Command Service to your project
- Connect the console to the command
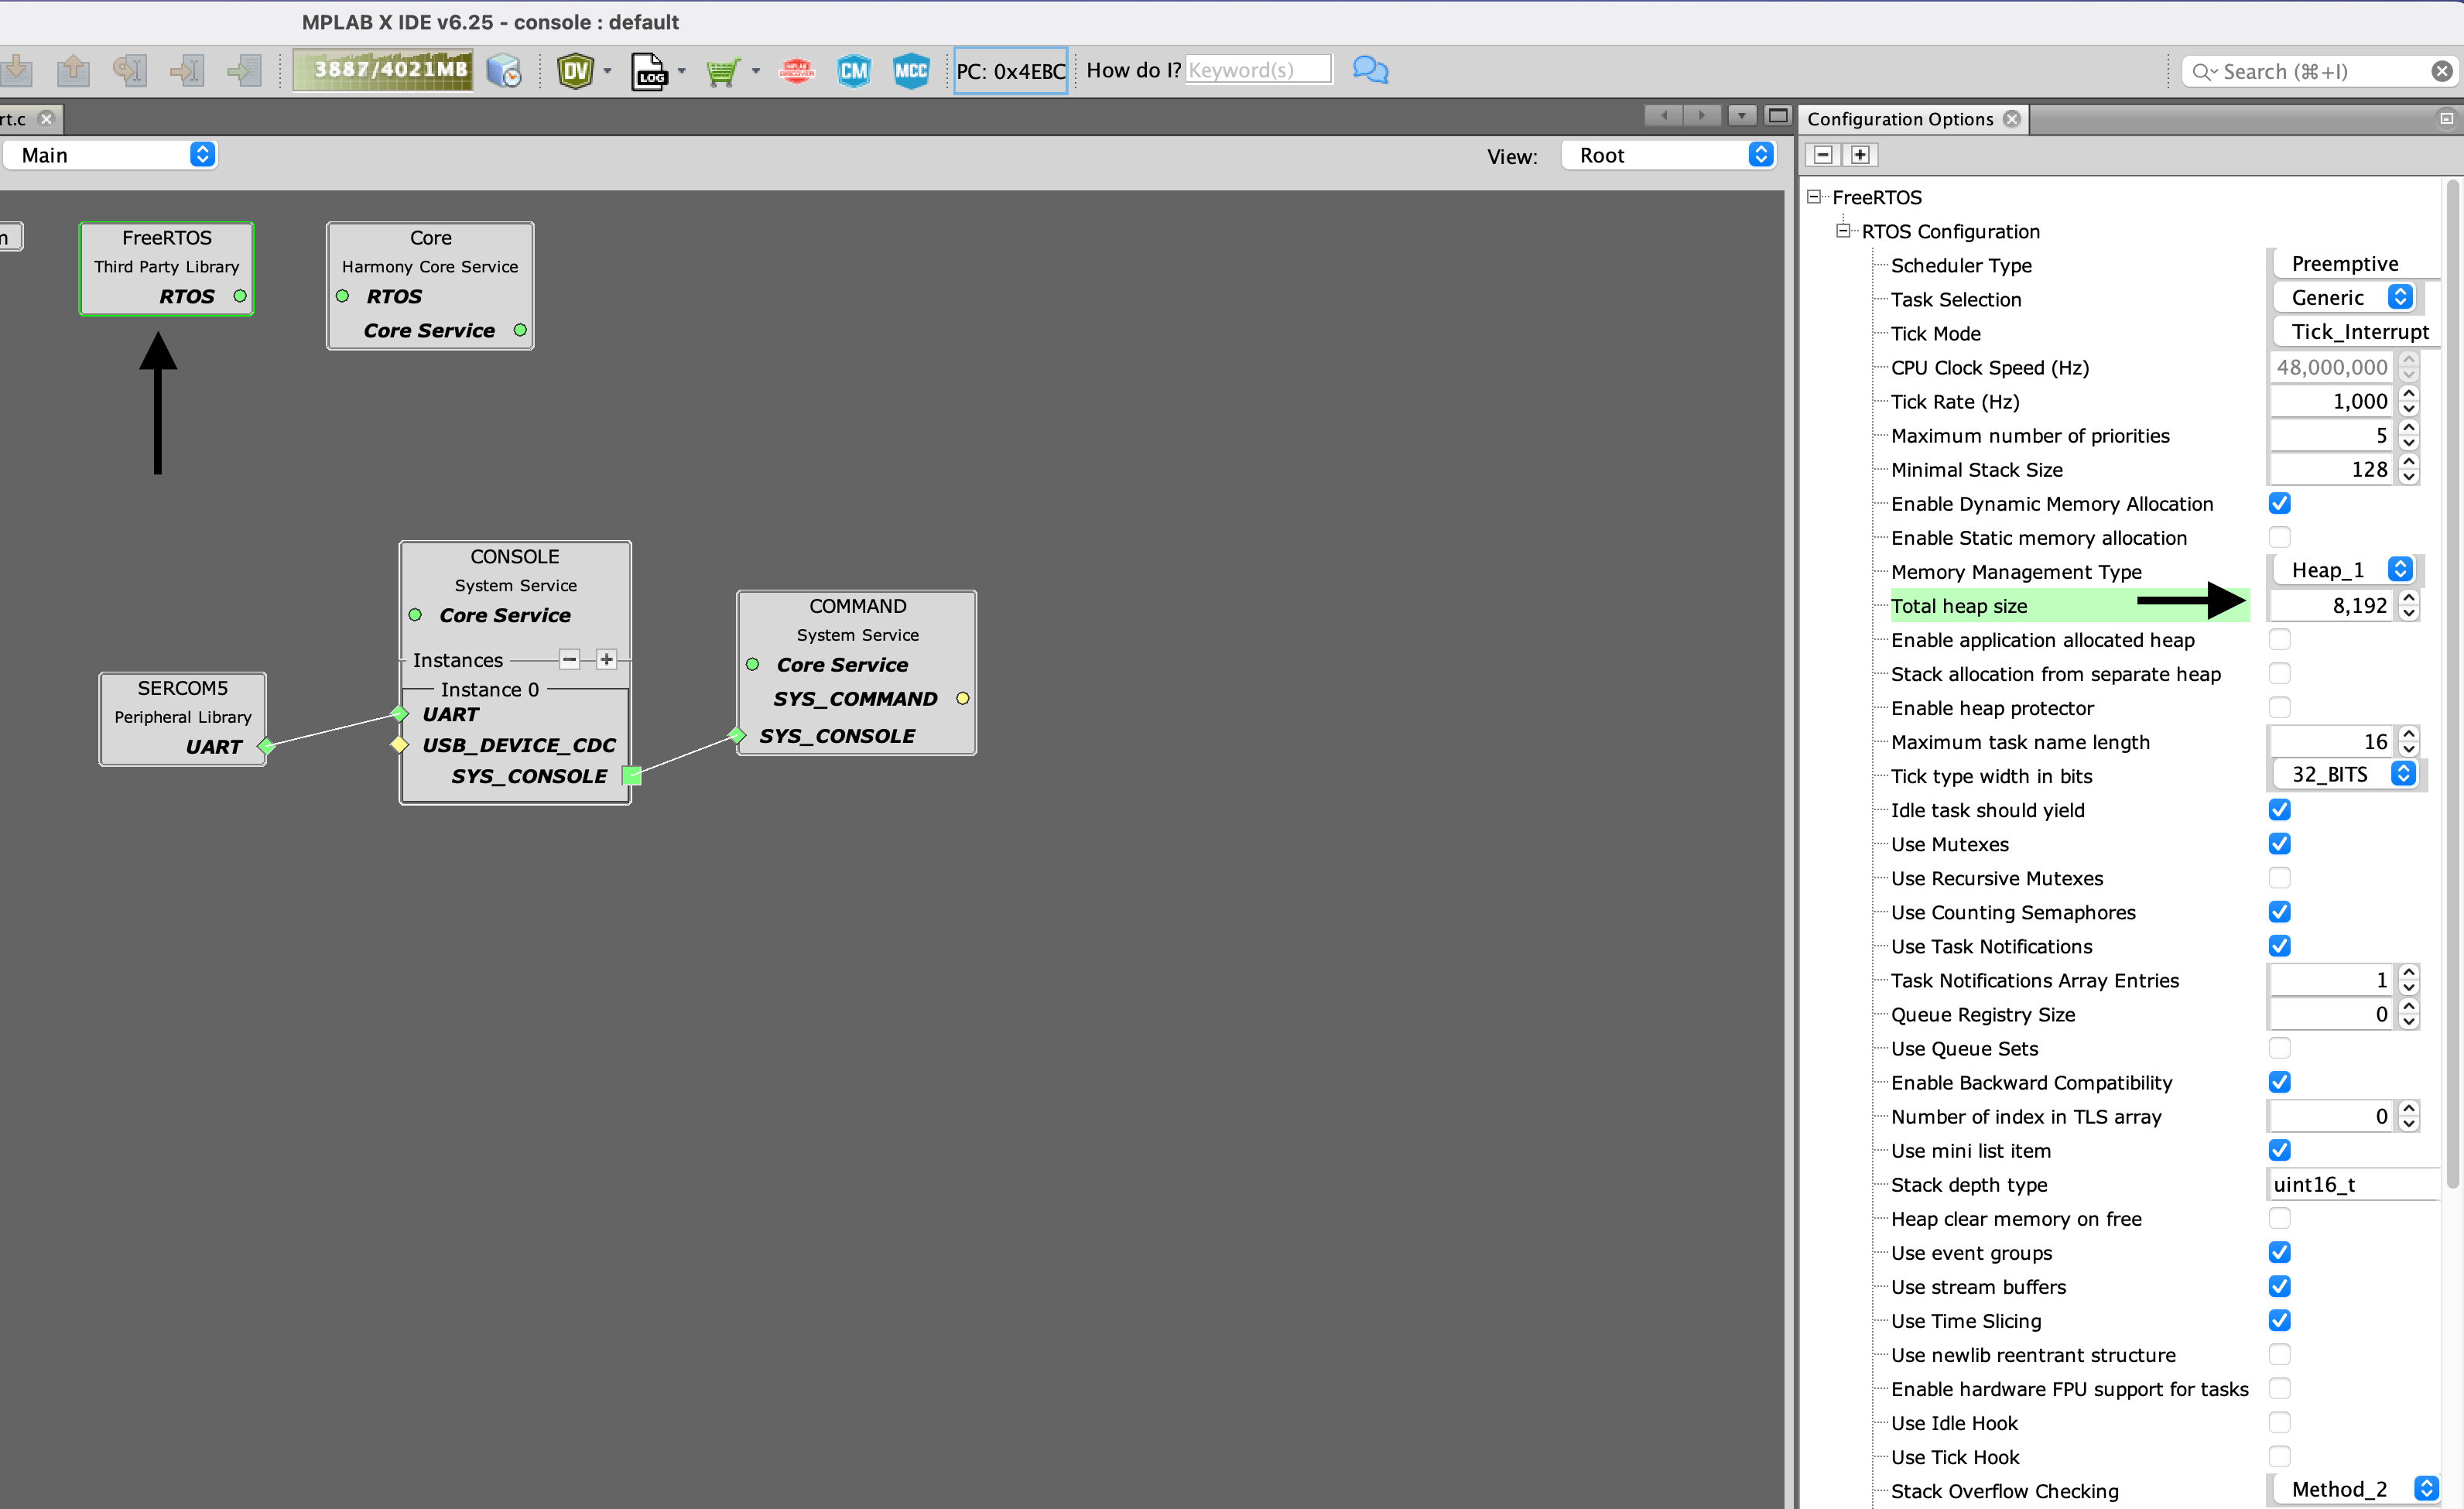
You may have noticed that the command module is included and has associated FreeRTOS configuration. This is because many Harmony services run as RTOS tasks and it's important to be aware of the settings and priorities so they don't negatively impact your application.
More information on how the command module is designed and works is available on the Microchip Harmony GitHub page.
Step 2: Configure Command Service Settings
Leave the configuration with the default settings. If you want to increase the length of commands or total buffer size, you can change those in the settings. Be sure to increase stack size if the buffer sizes are increased or if you accumulate a lot of commands. The help command available by default allows you to print documentation for your commands, and if the documentation gets large you will not be able to print the full help menu.
We will also increase the heap allocated to FreeRTOS to 8192 as our tasks may be larger than the 4096 bytes allocated by default.
Step 3: Generate Code
Click Generate Code to apply the changes and generate the necessary Command Service files.
Implementing Custom Commands
Step 4: Create Command Handlers
Now let's implement some custom commands. Add the following code to your app.c file:
Update the includes section:
#include "app.h"
#include "definitions.h"                // SYS function prototypes
#include <string.h>
#include <stdio.h>
Navigate to the section for callback functions around line 66. Add the following code:
// Command handler prototypes
static void APP_LedCommand(SYS_CMD_DEVICE_NODE* pCmdIO, int argc, char** argv);
static void APP_StatusCommand(SYS_CMD_DEVICE_NODE* pCmdIO, int argc, char** argv);
static void APP_EchoCommand(SYS_CMD_DEVICE_NODE* pCmdIO, int argc, char** argv);

// Command table
static const SYS_CMD_DESCRIPTOR appCmdTbl[] = {
    {"led",     APP_LedCommand,     ": LED control - led <on|off> \n"},
    {"status",  APP_StatusCommand,  ": Show system status\n"},
    {"echo",    APP_EchoCommand,    ": Echo back parameters - echo <text> \n"},
};

// LED Command Handler
static void APP_LedCommand(SYS_CMD_DEVICE_NODE* pCmdIO, int argc, char** argv)
{


    if (argc != 2) {
        SYS_CONSOLE_PRINT("Usage: led <on|off>\r\n");
        return;
    }

    if (strcmp(argv[1], "on") == 0) {
        LED0_Clear();  // Assuming you have LED0 configured in MCC
        SYS_CONSOLE_PRINT("LED turned ON\r\n");
    }
    else if (strcmp(argv[1], "off") == 0) {
        LED0_Set();
        SYS_CONSOLE_PRINT("LED turned OFF\r\n");
    }
    else {
        SYS_CONSOLE_PRINT("Invalid parameter. Use 'on' or 'off'\r\n");
    }
}

// Status Command Handler
static void APP_StatusCommand(SYS_CMD_DEVICE_NODE* pCmdIO, int argc, char** argv)
{
    SYS_CONSOLE_PRINT("=== System Status ===\r\n");
    SYS_CONSOLE_PRINT("Device: SAMD21\r\n");
    SYS_CONSOLE_PRINT("Firmware: v1.0.0\r\n");
    SYS_CONSOLE_PRINT("Uptime: %lu seconds\r\n", xTaskGetTickCount() / 1000);
    SYS_CONSOLE_PRINT("Free Heap: %d bytes\r\n", xPortGetFreeHeapSize());
}

// Echo Command Handler
static void APP_EchoCommand(SYS_CMD_DEVICE_NODE* pCmdIO, int argc, char** argv)
{
    SYS_CONSOLE_PRINT("Echo: ");
    for (int i = 1; i < argc; i++) {
        SYS_CONSOLE_PRINT("%s ", argv[i]);
    }
    SYS_CONSOLE_PRINT("\r\n");
}
What we are doing here is registering our functions in the appCmdTbl table. Each entry follows the format of commandName, functionToExecute, help message.
We also need to define the function prototypes using the format:
func_name(SYS_CMD_DEVICE_NODE* pCmdIO, int argc, char** argv);
And finally implement some functionality that is executed when the function is called. The command service is capable of parsing any arguments you pass in with the command and they are available to use within the function callback by checking argc which has the number of parameters received.
argc is 1 by default which contains the command itself. The arguments can be extracted from pointer to array argv. For example this code checks if the argument after the command was 'on' - all parameters will be strings. When working with numbers make sure to convert them using functions like atoi():
if (strcmp(argv[1], "on") == 0) {
    LED0_Clear();  // Assuming you have LED0 configured in MCC
    SYS_CONSOLE_PRINT("LED turned ON\r\n");
}
Step 5: Register Commands
We then need to register our command table with the command service. Add the following code to the APP_Initialize( void ) function:
void APP_Initialize ( void )
{
    /* Place the App state machine in its initial state. */
    appData.state = APP_STATE_INIT;

    // Register commands
    if (!SYS_CMD_ADDGRP(appCmdTbl, sizeof(appCmdTbl)/sizeof(*appCmdTbl),
                        "app", ": Application commands")) {
        SYS_CONSOLE_PRINT("Failed to create command group\r\n");
    }


    /* TODO: Initialize your application's state machine and other
     * parameters.
     */
}
Step 6: Update Application State Machine
Modify your application state machine to just do nothing:
void APP_Tasks ( void )
{

    /* Check the application's current state. */
    switch ( appData.state )
    {
        /* Application's initial state. */
        case APP_STATE_INIT:
        {
            bool appInitialized = true;

            SYS_CONSOLE_PRINT("UART Command Service Demo\r\n");
            SYS_CONSOLE_PRINT("Type 'help' for available commands\r\n");
            if (appInitialized)
            {

                appData.state = APP_STATE_SERVICE_TASKS;
            }
            break;
        }

        case APP_STATE_SERVICE_TASKS:
        {

            break;
        }

        /* TODO: implement your application state machine.*/


        /* The default state should never be executed. */
        default:
        {
            /* TODO: Handle error in application's state machine. */
            break;
        }
    }
}
Full code is included at the end.
Testing the Command Interface
Step 7: Build and Test
- Build and program your project onto the SAMD21 board
- Open a terminal application like the trusty plotSerial
- Connect to your device's debug port
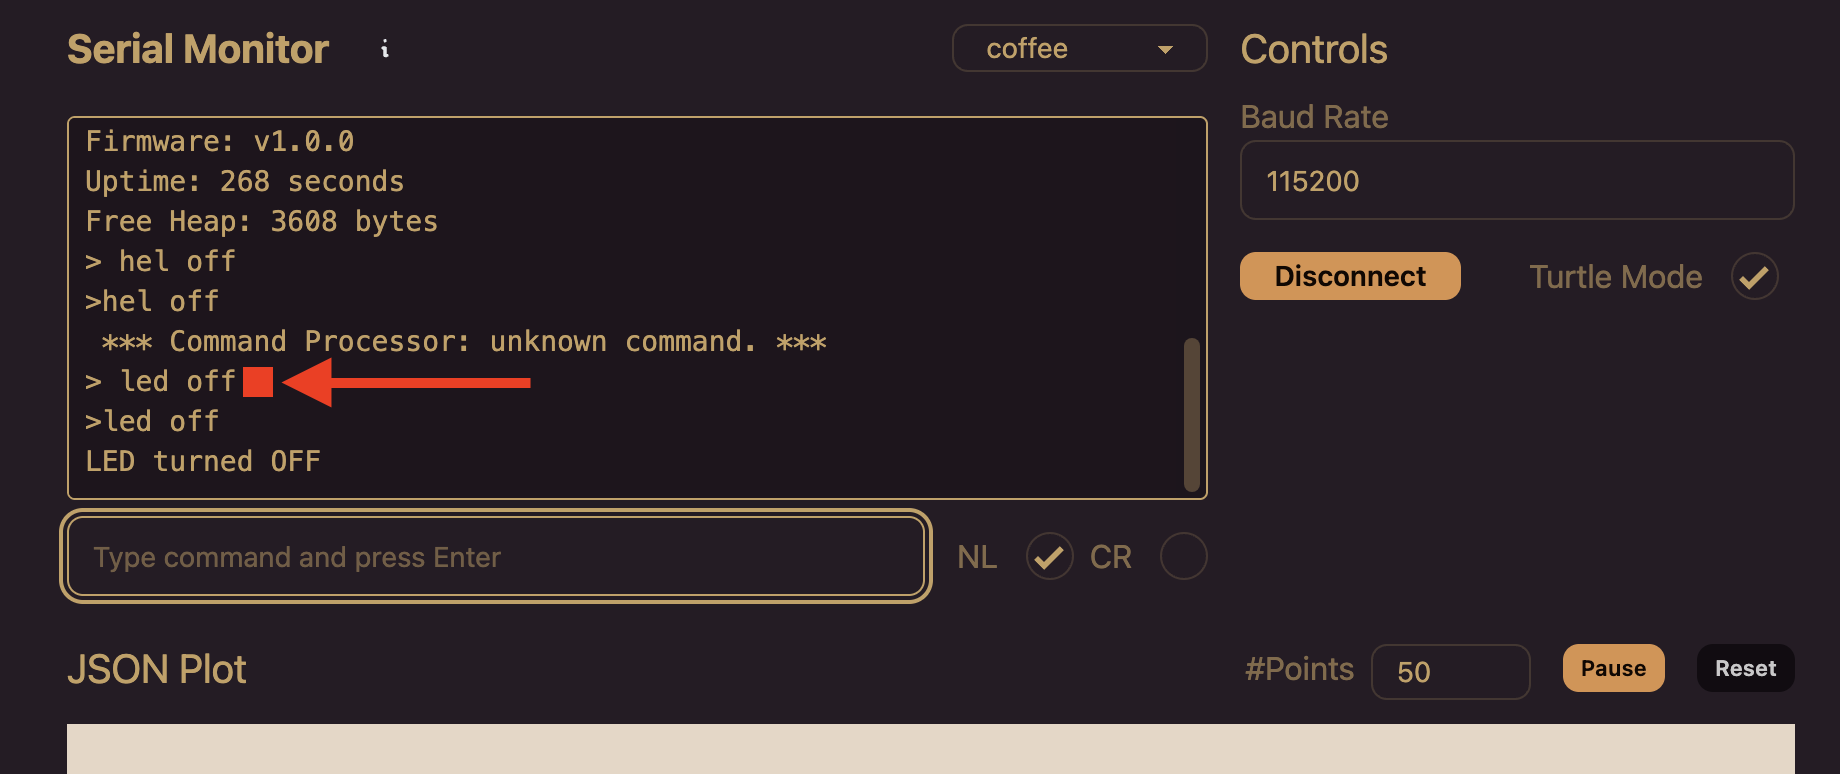
You should see the welcome message, and you can now try the following commands:
help
status
led on
led off
echo Hello World
The help and help app commands will give command-related documentation like a list of command tables registered, and help app will show all the text which we included with each command.
This is helpful to use as a reminder once we have more commands.

The status command prints some information about our device and time since the device was powered on. The free heap allows us to track heap usage which we set to 8KB.
As we see, the free space is just over 3KB, meaning our initial allocation of 4KB would have failed.

The led on or led off command does exactly that - allows you to control the LED0 status.
Finally, the echo hello world command is an example of how to handle multiple arguments. You can test it by adding additional text like:
echo this message is from samd21
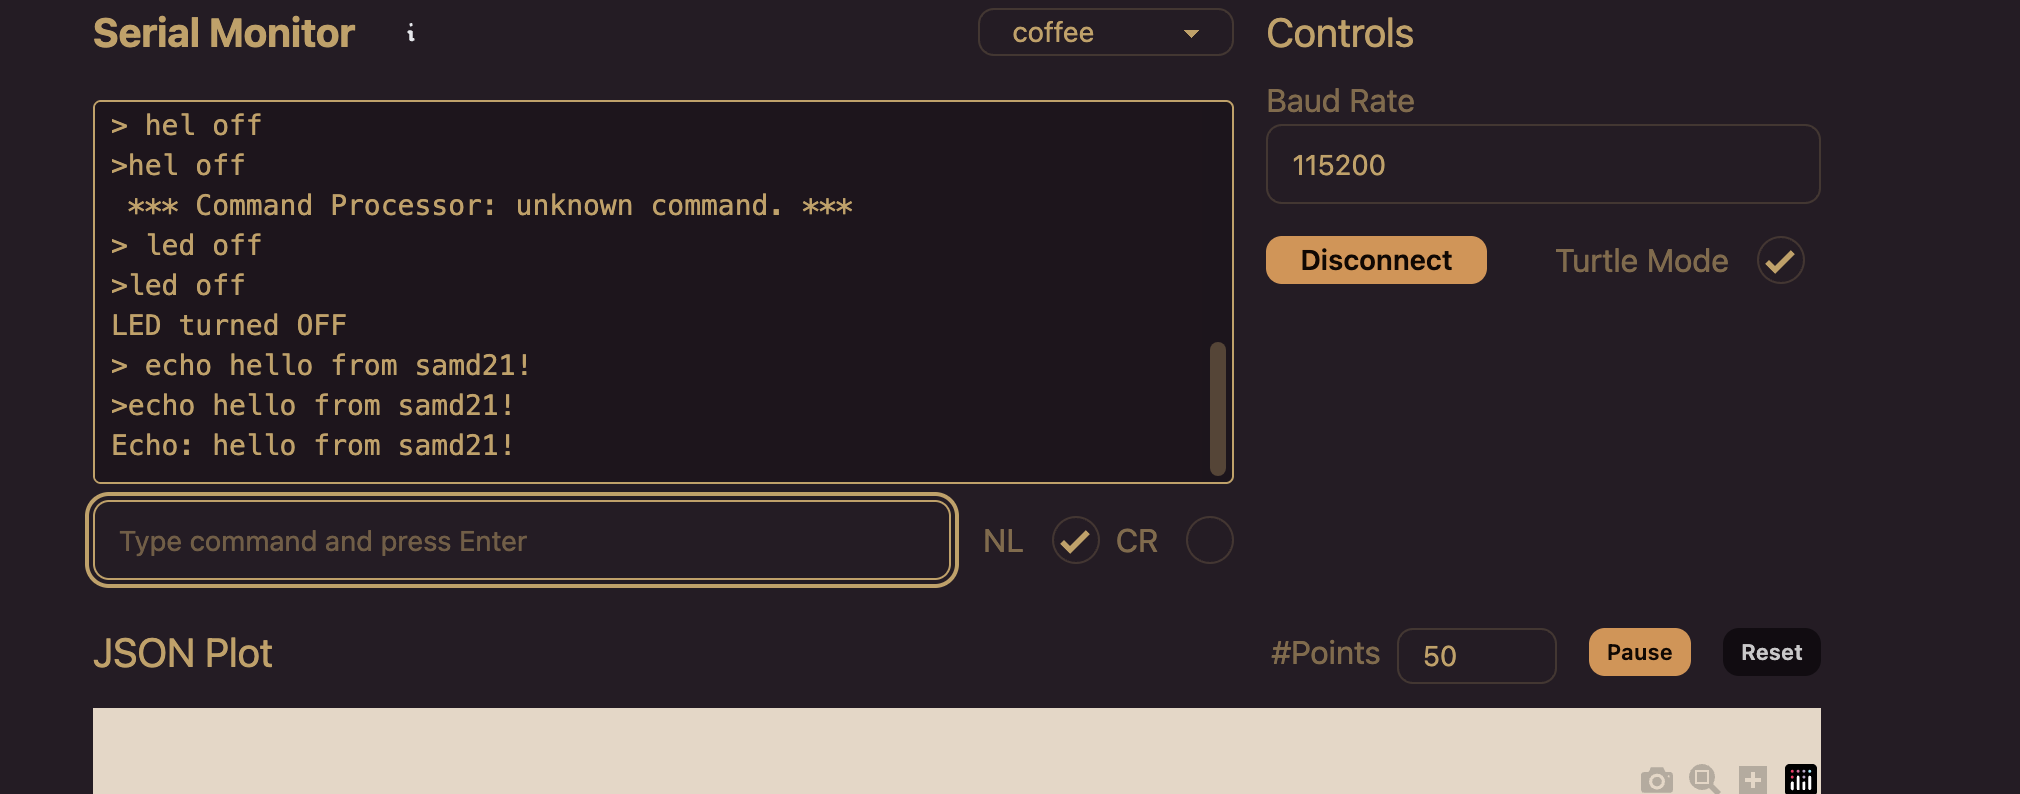
Note that by default the command module assumes we are using a terminal like PuTTY and will echo each sent character. plotSerial does the same by default, which results in outgoing text showing twice and is indicated by the ">" character. The response from the device will not have this character.
Implementing Command History
The Command Service supports basic command history with up/down arrow keys when used with compatible terminal applications. The plotSerial application already implements command history.
Conclusion
The Harmony Command Service provides a powerful foundation for building interactive embedded systems. By combining it with the Console Service, you can create sophisticated command-line interfaces that make your devices easy to debug, configure, and demonstrate.
This command interface opens up many possibilities:
- Remote device configuration
- Real-time debugging and monitoring
- Automated testing scripts
- Interactive demonstrations
In future tutorials, we'll explore more advanced features like persistent configuration storage, file system commands, and integration with other Harmony services.
Stay tuned for more embedded systems tutorials! 🚀
Full Source Code
/*******************************************************************************
  MPLAB Harmony Application Source File

  Company:
    Microchip Technology Inc.

  File Name:
    app.c

  Summary:
    This file contains the source code for the MPLAB Harmony application.

  Description:
    This file contains the source code for the MPLAB Harmony application.  It
    implements the logic of the application's state machine and it may call
    API routines of other MPLAB Harmony modules in the system, such as drivers,
    system services, and middleware.  However, it does not call any of the
    system interfaces (such as the "Initialize" and "Tasks" functions) of any of
    the modules in the system or make any assumptions about when those functions
    are called.  That is the responsibility of the configuration-specific system
    files.
 *******************************************************************************/

// *****************************************************************************
// *****************************************************************************
// Section: Included Files
// *****************************************************************************
// *****************************************************************************

#include "app.h"
#include "definitions.h"                // SYS function prototypes
#include <string.h>
#include <stdio.h>
// *****************************************************************************
// *****************************************************************************
// Section: Global Data Definitions
// *****************************************************************************
// *****************************************************************************

// *****************************************************************************
/* Application Data

  Summary:
    Holds application data

  Description:
    This structure holds the application's data.

  Remarks:
    This structure should be initialized by the APP_Initialize function.

    Application strings and buffers are be defined outside this structure.
*/

APP_DATA appData;

// *****************************************************************************
// *****************************************************************************
// Section: Application Callback Functions
// *****************************************************************************
// *****************************************************************************

/* TODO:  Add any necessary callback functions.
*/

// Command handler prototypes
static void APP_LedCommand(SYS_CMD_DEVICE_NODE* pCmdIO, int argc, char** argv);
static void APP_StatusCommand(SYS_CMD_DEVICE_NODE* pCmdIO, int argc, char** argv);
static void APP_EchoCommand(SYS_CMD_DEVICE_NODE* pCmdIO, int argc, char** argv);

// Command table
static const SYS_CMD_DESCRIPTOR appCmdTbl[] = {
    {"led",     APP_LedCommand,     ": LED control - led <on|off> \n"},
    {"status",  APP_StatusCommand,  ": Show system status\n"},
    {"echo",    APP_EchoCommand,    ": Echo back parameters - echo <text> \n"},
};

// LED Command Handler
static void APP_LedCommand(SYS_CMD_DEVICE_NODE* pCmdIO, int argc, char** argv)
{


    if (argc != 2) {
        SYS_CONSOLE_PRINT("Usage: led <on|off>\r\n");
        return;
    }

    if (strcmp(argv[1], "on") == 0) {
        LED0_Clear();  // Assuming you have LED0 configured in MCC
        SYS_CONSOLE_PRINT("LED turned ON\r\n");
    }
    else if (strcmp(argv[1], "off") == 0) {
        LED0_Set();
        SYS_CONSOLE_PRINT("LED turned OFF\r\n");
    }
    else {
        SYS_CONSOLE_PRINT("Invalid parameter. Use 'on' or 'off'\r\n");
    }
}

// Status Command Handler
static void APP_StatusCommand(SYS_CMD_DEVICE_NODE* pCmdIO, int argc, char** argv)
{
    SYS_CONSOLE_PRINT("=== System Status ===\r\n");
    SYS_CONSOLE_PRINT("Device: SAMD21\r\n");
    SYS_CONSOLE_PRINT("Firmware: v1.0.0\r\n");
    SYS_CONSOLE_PRINT("Uptime: %lu seconds\r\n", xTaskGetTickCount() / 1000);
    SYS_CONSOLE_PRINT("Free Heap: %d bytes\r\n", xPortGetFreeHeapSize());
}

// Echo Command Handler
static void APP_EchoCommand(SYS_CMD_DEVICE_NODE* pCmdIO, int argc, char** argv)
{
    SYS_CONSOLE_PRINT("Echo: ");
    for (int i = 1; i < argc; i++) {
        SYS_CONSOLE_PRINT("%s ", argv[i]);
    }
    SYS_CONSOLE_PRINT("\r\n");
}

// *****************************************************************************
// *****************************************************************************
// Section: Application Local Functions
// *****************************************************************************
// *****************************************************************************


/* TODO:  Add any necessary local functions.
*/


// *****************************************************************************
// *****************************************************************************
// Section: Application Initialization and State Machine Functions
// *****************************************************************************
// *****************************************************************************

/*******************************************************************************
  Function:
    void APP_Initialize ( void )

  Remarks:
    See prototype in app.h.
 */

void APP_Initialize ( void )
{
    /* Place the App state machine in its initial state. */
    appData.state = APP_STATE_INIT;

    // Register commands
    if (!SYS_CMD_ADDGRP(appCmdTbl, sizeof(appCmdTbl)/sizeof(*appCmdTbl),
                        "app", ": Application commands")) {
        SYS_CONSOLE_PRINT("Failed to create command group\r\n");
    }


    /* TODO: Initialize your application's state machine and other
     * parameters.
     */
}


/******************************************************************************
  Function:
    void APP_Tasks ( void )

  Remarks:
    See prototype in app.h.
 */

void APP_Tasks ( void )
{

    /* Check the application's current state. */
    switch ( appData.state )
    {
        /* Application's initial state. */
        case APP_STATE_INIT:
        {
            bool appInitialized = true;

            SYS_CONSOLE_PRINT("UART Command Service Demo\r\n");
            SYS_CONSOLE_PRINT("Type 'help' for available commands\r\n");
            if (appInitialized)
            {

                appData.state = APP_STATE_SERVICE_TASKS;
            }
            break;
        }

        case APP_STATE_SERVICE_TASKS:
        {
//            static int i = 0;
//            SYS_CONSOLE_PRINT("Hello from Console %d \n", i);
//            i++;
            break;
        }

        /* TODO: implement your application state machine.*/


        /* The default state should never be executed. */
        default:
        {
            /* TODO: Handle error in application's state machine. */
            break;
        }
    }
}


/*******************************************************************************
 End of File
 */